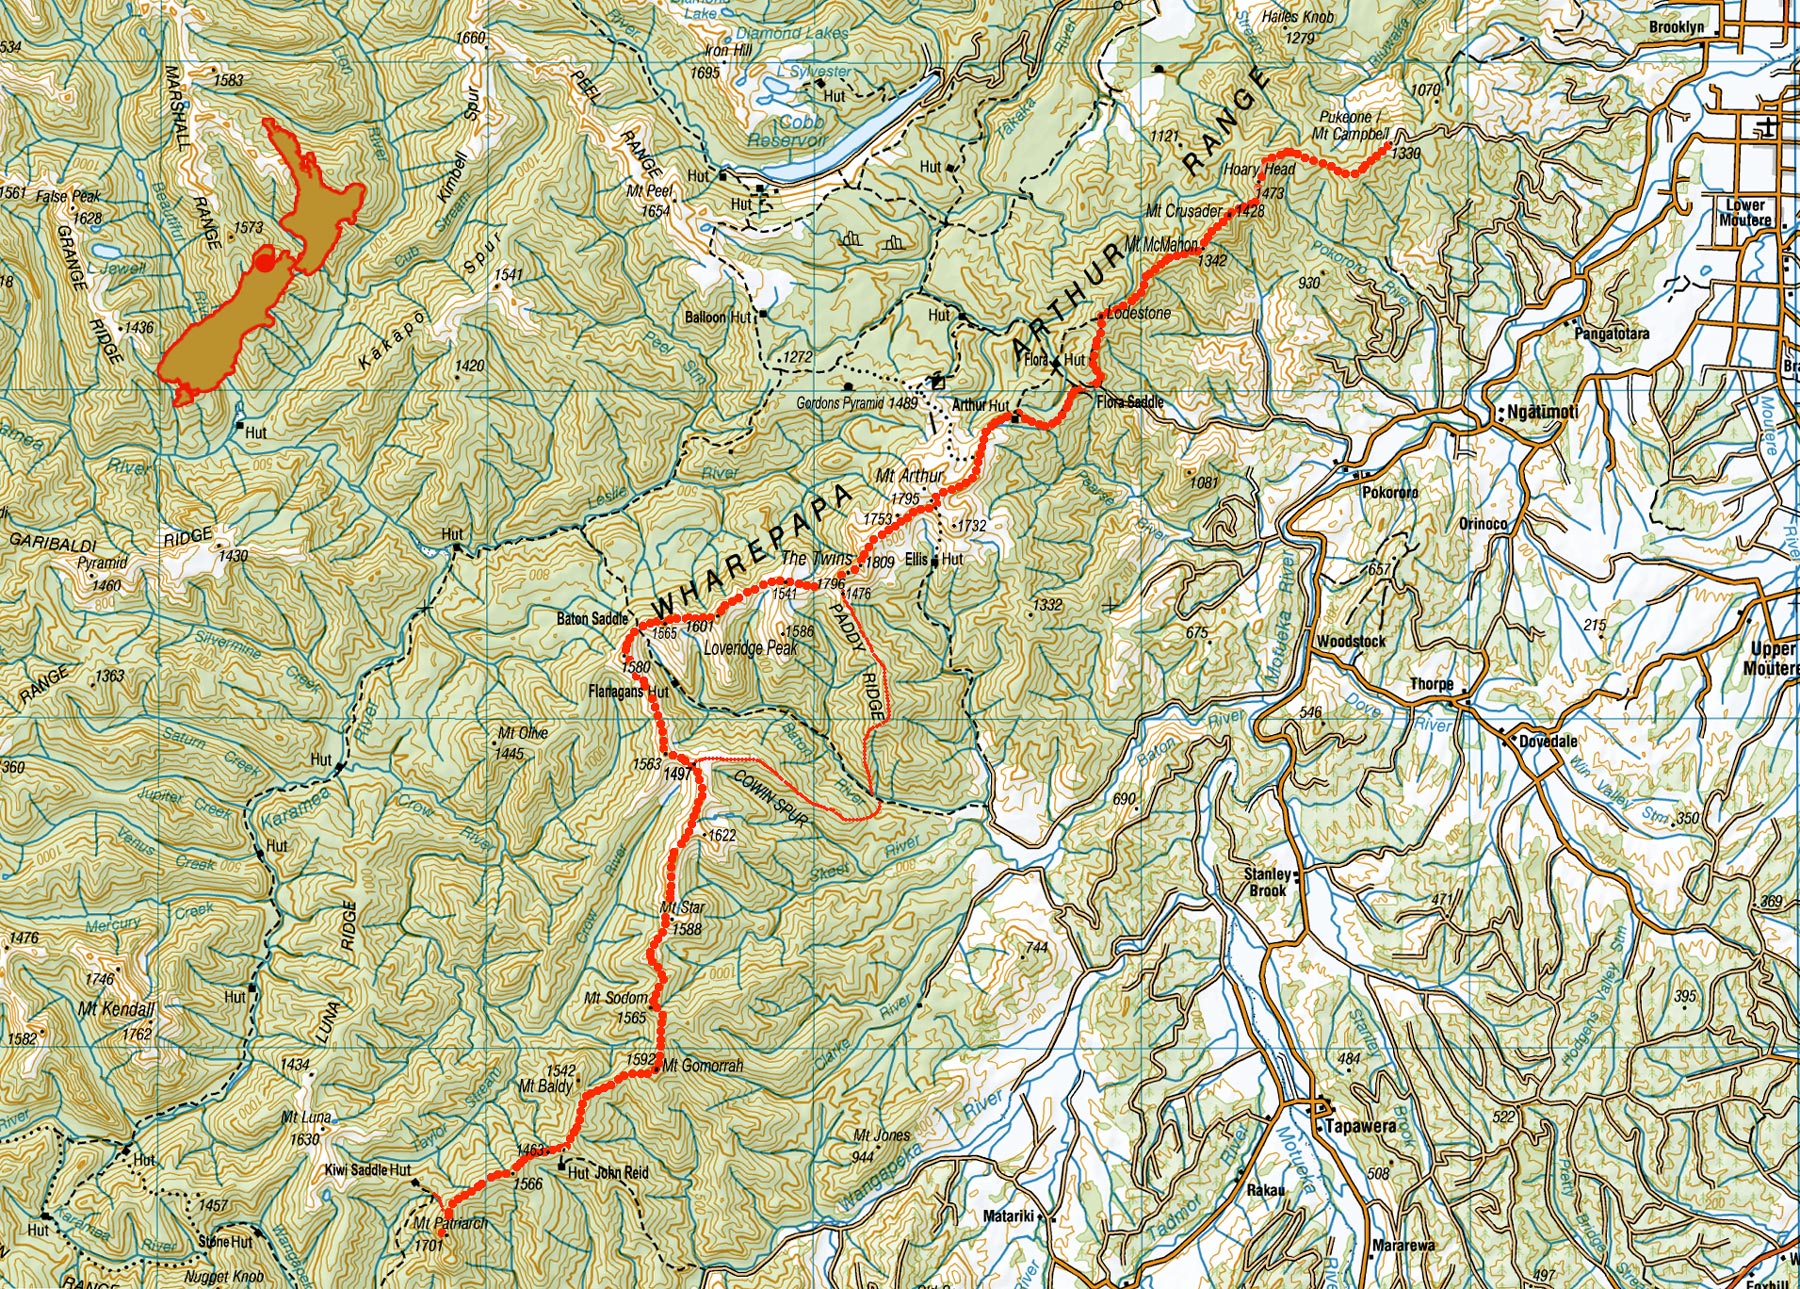
Tramping Wharepapa (Mt Campbell to Mt Patriarch)
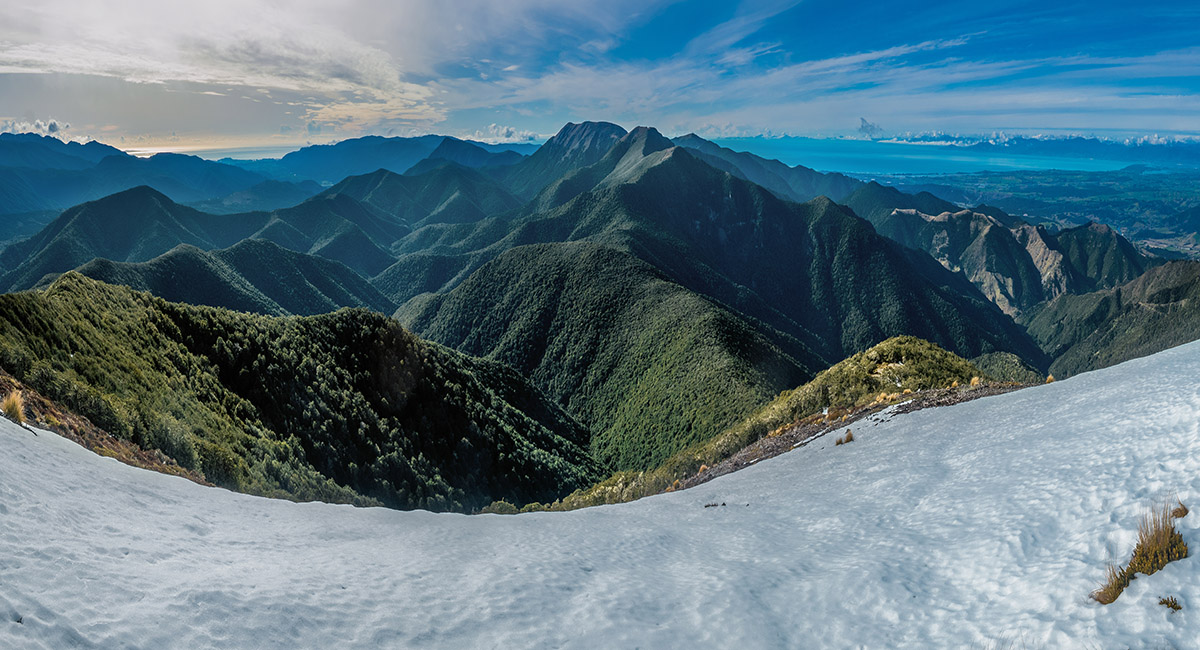
Although I didn’t know it at the time, I began my quest to tramp 85kms of Wharepapa/Arthur Range’s ridge top in January 2015, when I went with my family for a stroll up Mt Arthur. Though only The Twins are higher than Mt Arthur, in the coming decade I would discover that the section between Flora Saddle and Mt Arthur is by a large margin the easiest section of the range to tramp. For starters, being able to drive up to 940 metres provides a big help. That’s the same height as Flanagan’s Hut at the head of Baton River, which takes six or so hours from the swing bridge down below 300 metres, not to mention half a dozen river crossings that guarantee wet boots for the rest of the trip. The terrain of the Mt Arthur route is also open and relatively flat, which is reflected in the Māori name Wharepapa – whare: house, papa: flat.

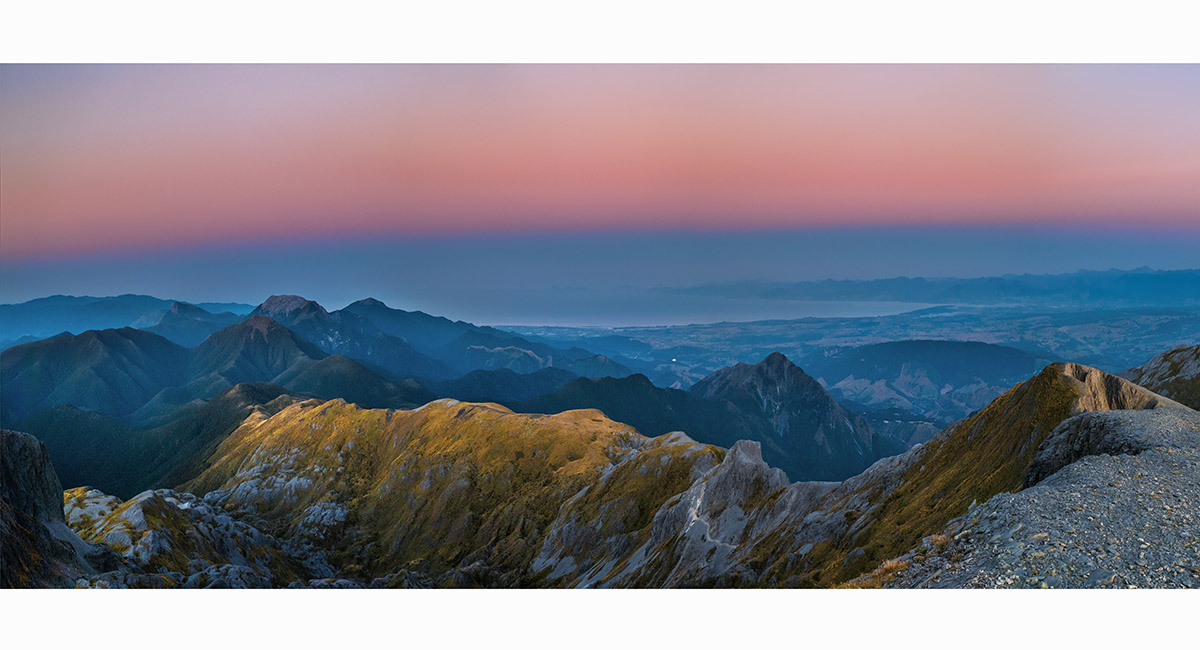
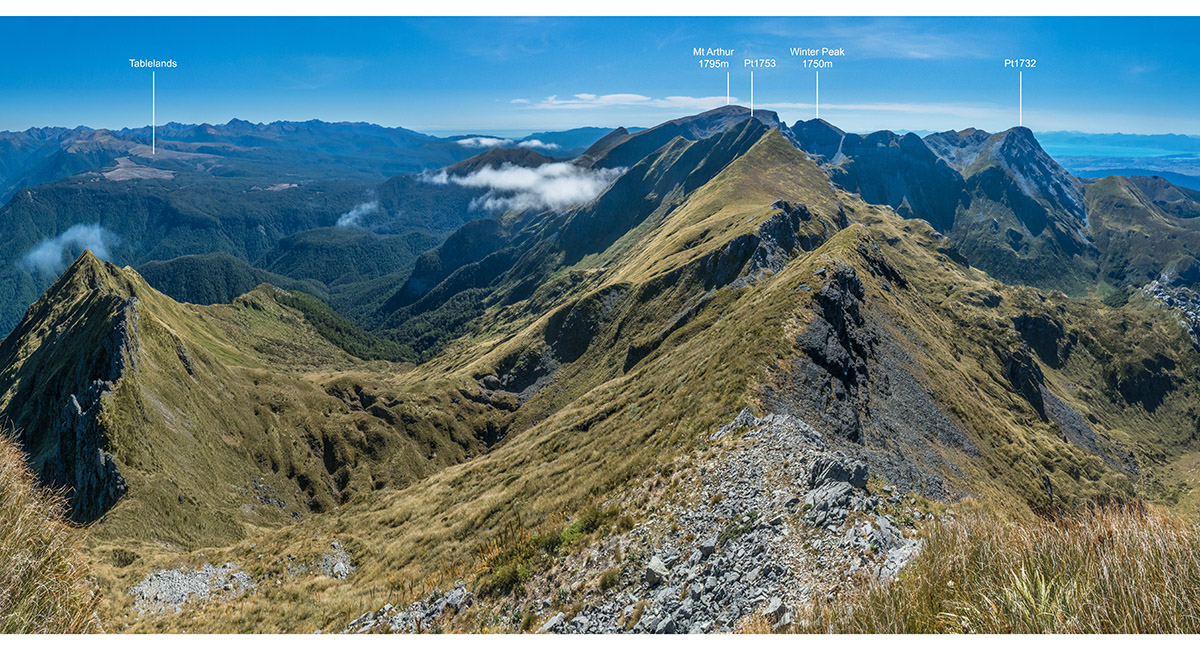
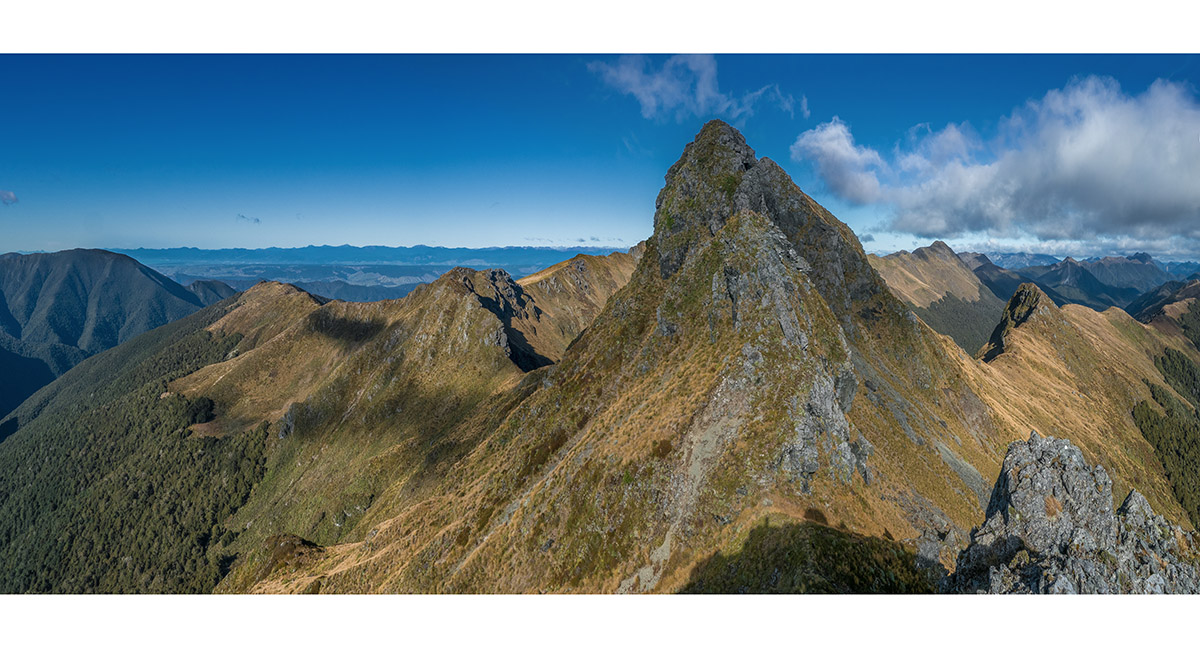
A July view from winter Peak to Mt Arthur (right) and the Twins (left)
There’s no need to dwell on the climb of Mt Arthur, as most people who’ve visited Wharepapa will likely have been up it. It’s worth acknowledging though that there are some great ‘extras’ to enjoy from this broad karst summit. The northeast ridge linking to the Gordon’s Pyramid route offers some more exposed ridge travel and the ‘Eye of the Needle’, about halfway along that ridge, is a quirky piece of landscape.


The spur branching south to Winter Peak and then along to Pt1732 also offers nice perspectives of the range. I’ve bivvied on top of Mt Arthur to enjoy magic hour photography and cramponed up it to get a quick and easy alpine winter fix. So while it’s a doddle to get up, it’s still a jewel of the Tasman region. I‘ve yet to head along the north ridge to the mountain’s almost 1700-metre outlier, so Mt Arthur keeps on giving.

My second visit to the range was in March 2018 when, as part of a group of four, I went in up Chummies Track to John Reid Hut, then accessed the main range at the 1400-metre saddle directly above. On our first night we bivvied on the flat tussock of Pt1463, just west of the saddle. We were blessed with a fantastic sunset and sunrise, before heading southwest to the point giving access to the Kiwi Saddle route. The ridge top travel along this section of the range was all quite straight forward. Before dropping to Kiwi Saddle, my mate Shaun and I dropped our packs and scrambled up the rugged karst to Mt Patriarch’s 1701-metre summit. Our view further south to the mountain’s secondary summit confirmed a doable but slow route over broken karst. Our destination that evening was Stone Hut, via Kiwi Saddle, then up again to the 1400-metre saddle beneath Mt Luna, so we didn’t push on beyond Patriarch’s main summit.


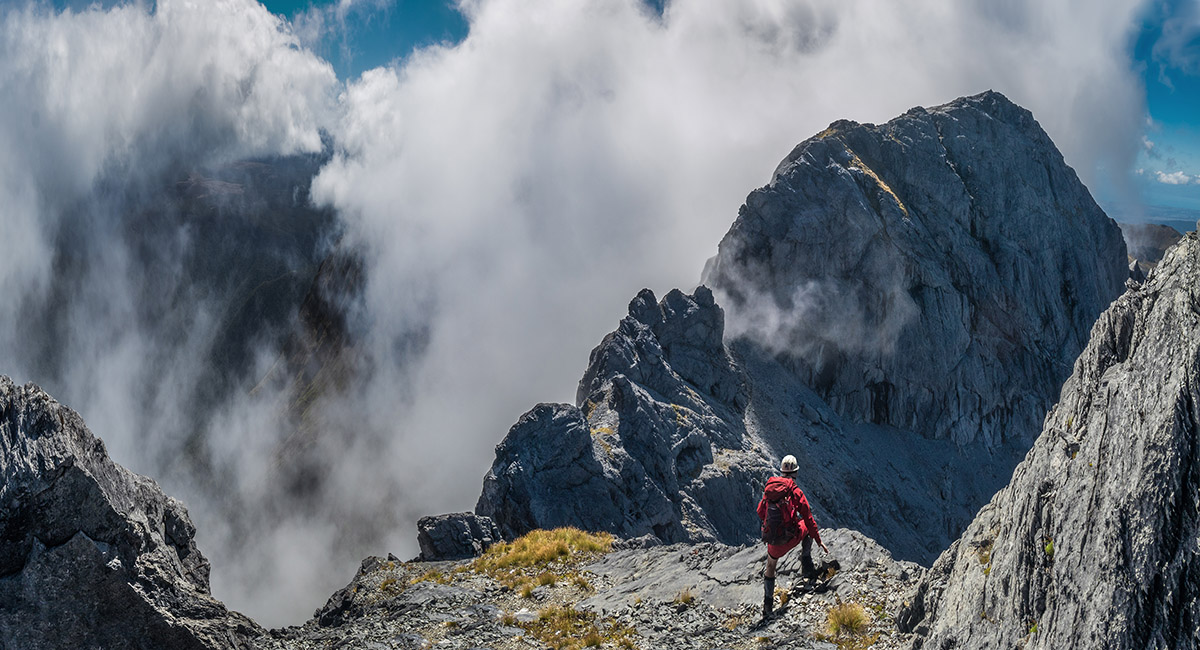
To this day Patriarch marks the southern-most point of my Wharepapa experiences. Later on that 2018 tramp I found myself, somewhat beaten up by stinging nettle and wasps, on Baton Saddle in clag. From Stone Hut we bagged Nugget Knob before camping on day three at Biggs Tops (what a fabulous spot that is). Then over the next two days we made our way up Karamea River, with a night at Venus Hut, then another at Karamea Bend Hut, before heading up the Baton Saddle route, marked ‘total horror’ on the sign at its northern base. In the clag on Baton Saddle I could see nothing of the terrain either south or east along the range – just slippery, overgrown, rutted terrain guarded by legions of Spaniards, steeply dropping to bog at the head of Baton River. By the time we reached Flanagan’s Hut I’d vowed not to visit Baton Saddle again. How wrong I was.


It was when my partner Cathy and I moved to Richmond in December 2022 that my Wharepapa ‘quest’ crystallised. From my home I look directly west, taking in the entire span of Wharepapa, and some. It was then that I vowed to tramp the entire range, at least between Pukeone/Mt Campbell in the northeast (4wd access to 1330m) and Mt Patriarch.

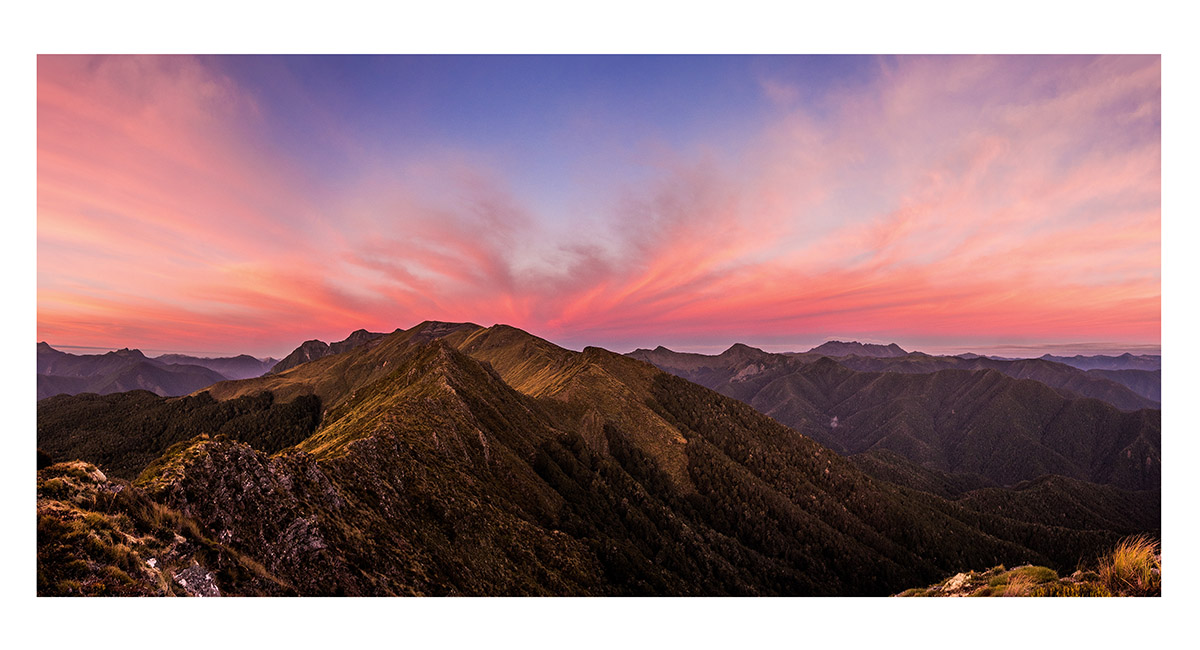
Pukeone/Mt Campbell summit view southwest
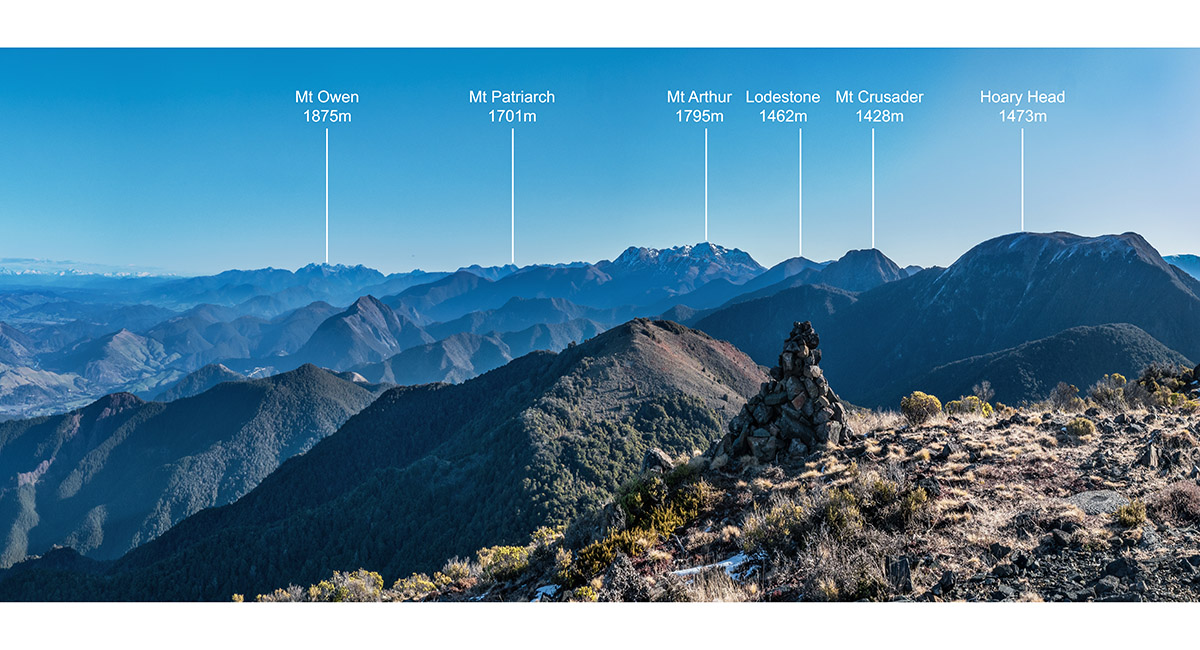
After a few shorter forays during 2023 to Lodestone, Crusader, Pukeone/Mt Campbell and Hoary Head from each end, I teamed up with Bruce Davies and Simon Le Gro in February 2024 to string together those high points in one 10-hour push, beginning on Pukeone/Mt Campbell and finishing at the Flora Saddle car park.

One of the challenges on this stretch in summer, and indeed for most of Wharepapa, is the lack of nearby water sources along the route. It was hot work making our way westwards from Mt Campbell.

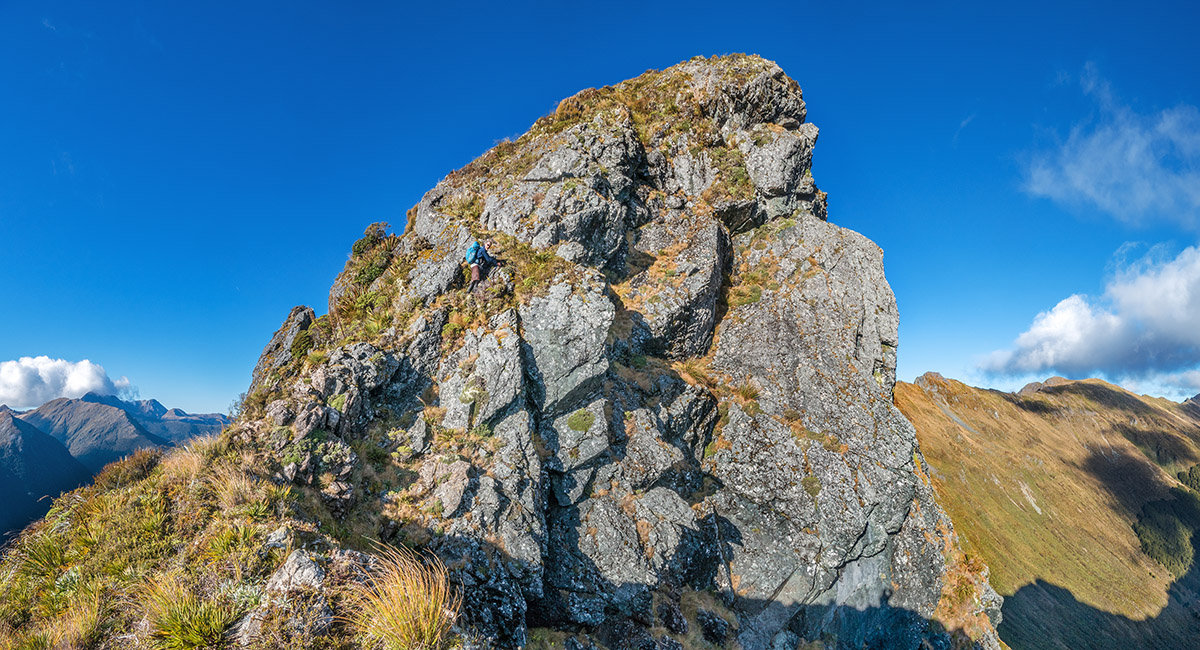
Aside from thirst, the main challenges on this stretch are some route finding in the broader forest sections before Hoary Head; some scrambling on overgrown karst on the east side of Hoary Head; the crux – climbing about 180 metres of quite exposed, steep karst on the east side of Crusader (best to climb rather than descend); and some scrambly, finicky route finding on the west side of McMahon. I enjoyed some nice views out to Golden Bay, Tasman Bay, the Richmond Range and southwest along Wharepapa on this section. It’s a good solid day’s tramping, but the ‘business end’ of Wharepapa begins south of Mt Arthur.

Once established in Richmond, my initial focus was on The Twins – reputedly the crux of the entire range. I climbed South Twin with Shaun Barnett in March 2023 from Ellis Hut. We also exited, after a bivvy at about 1500 metres beside two small tarns in the upper basin, beneath the high points between North Twin and Mt Arthur. So I was gradually tagging sporadic stretches of the skyline.

It was May 2024 though, teaming up with Jim Davidson, that we got the Twins traverse done. That’s a nice adventure and indeed proved to be the most technical section of Wharepapa. Jim and I used bolts to rap a couple of times and the shiny stainless-steel chains installed on several spots kept my adrenaline levels manageable. We took about 10 hours from Flora car park to Ellis Hut on that occasion.

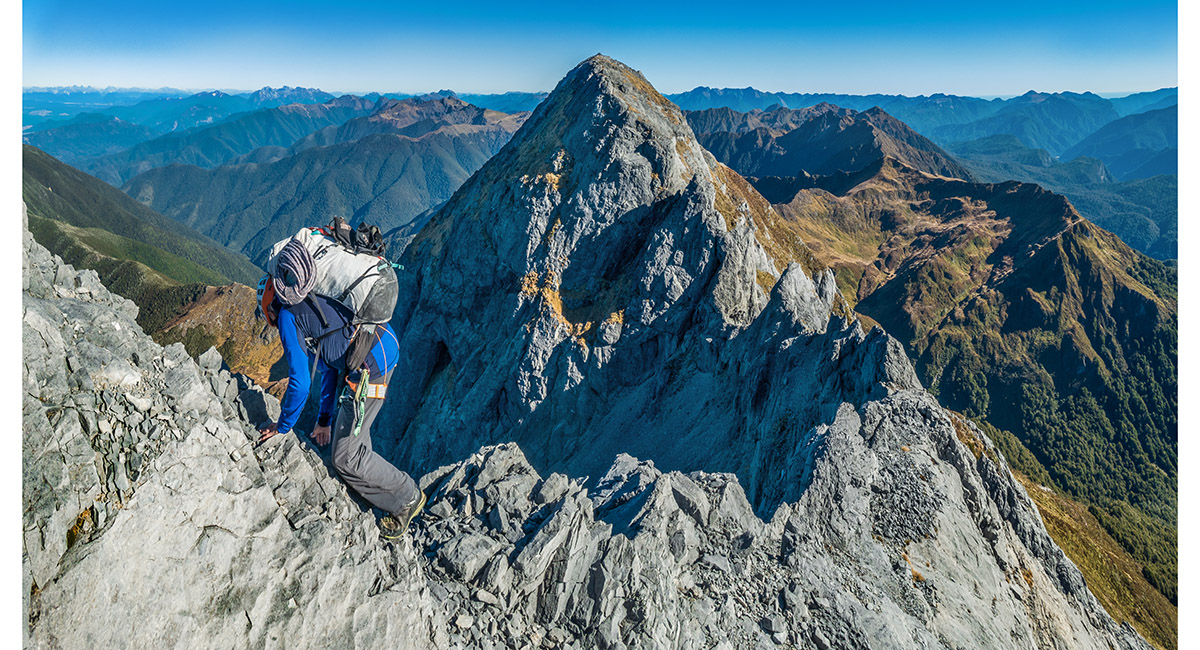

I returned on a fine day in March 2025 to tag the three high points between Mt Arthur and North Twin. I didn’t quite get the job done though. The bluffs west of Pt1753 are beyond my skills and nerve without a rope. And the very steep south end of the 1750-metre point just north of North Twin, turned me back. Bruce Davies advises that there is a safe zigzag route off the top on the west side though.

So how about the remaining terrain between South Twin and John Reid Hut? That has occupied Bruce Davies and I since we naively set off to knock the whole lot off in one go in January 2025. We retraced my steps of 2018 back up to John Reid Hut, where we had a rest while waiting for the searing summer sun to drop lower in the sky. Each with 3 litres of water on board, we then climbed onto the main range above the hut. This time, rather than west to Mt Patriarch, we set off north to Mt Gomorrah.

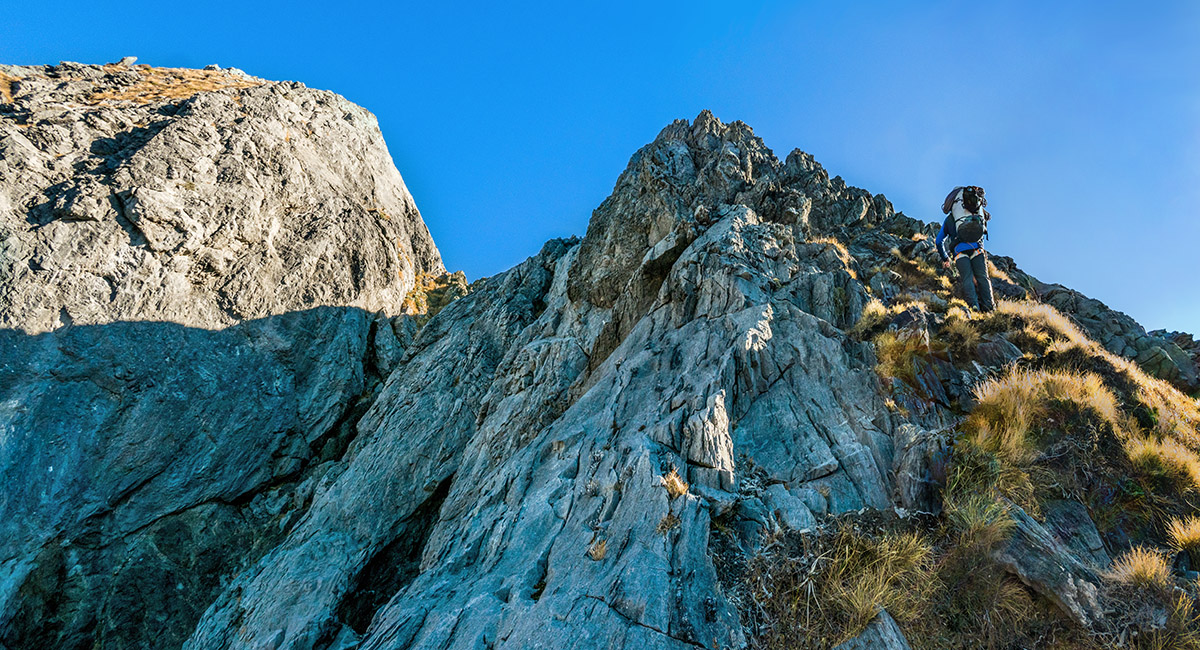
It soon became apparent to us that the going was not as straight forward as it appears on the topo map. Beyond The Twins, we have grown to know well countless ups and downs, quite often requiring the use of both hands on steep, sometimes exposed ground. On our approach to Mt Gomorrah we also had a couple of bush grovels where the ridge dipped below 1300 metres.


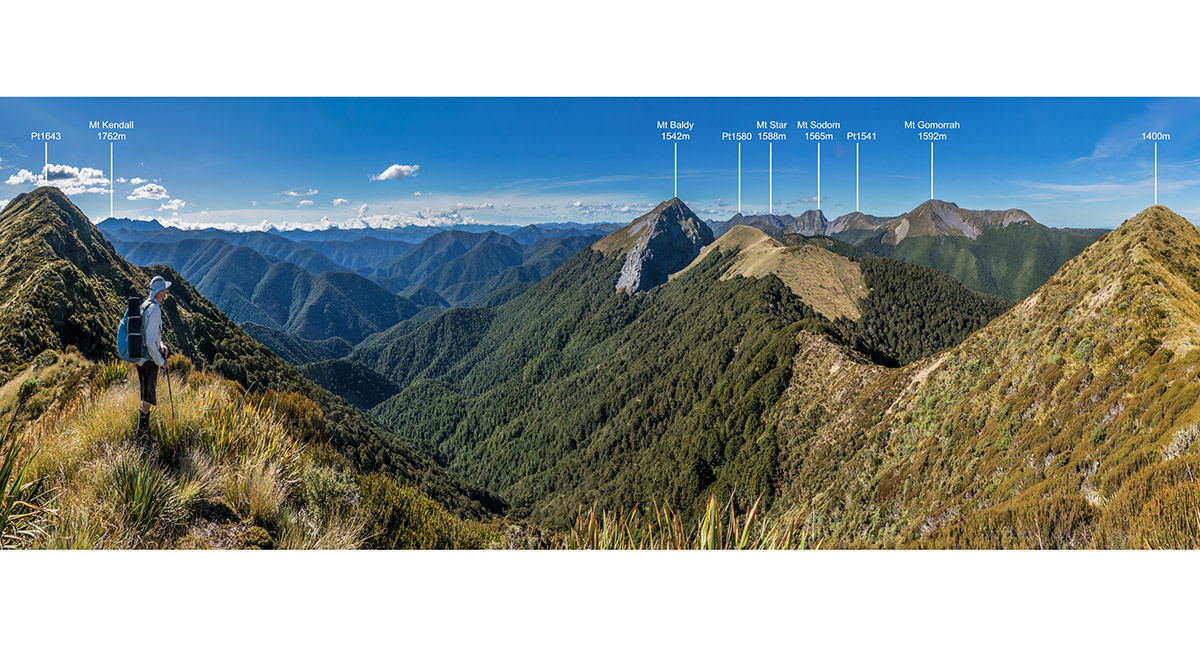
Arriving on Mt Gomorrah’s broad flat 1592-metre summit not long before sunset was a blast. The views are superb. And it was nice to rest after about 8 hours of tramping. The night was cold but the dawn gloriously revealed a clear day. While Bruce is a machine, I had not recovered very well from our previous day’s toils and found the going tough as we made our way, over Pt1541, to the intimidating base of Mt Sodom. The terrain on its west side revealed a very steep sidle giving access to the ridge again, north of Sodom’s 1565-metre summit. We were glad to be ascending this rather than descending – it’s similar to the east face of Crusader. On the ridge we dropped packs and tagged the summit, before dropping down an impressively narrow section of ridge to Skeet Saddle, back below the bush line. Then up again to Pt1458, before another drop to Hough Saddle.

Ahead reared up the craggy black rock of Mt Star. To stay on the ridge demands proper rock climbing, but an arduous sidle on the west side leads to a small saddle south of some more inhospitable ridge top. Another sidle, now on the east side got us back on the ridge south of Pt1633. By now, given my slow progress, we realised there was no way we could cover the ground we had hoped to on this trip, so we decided to call it a day beside a beautiful tarn below and north of Pt1622. It had taken 8 hours or so to reach here.


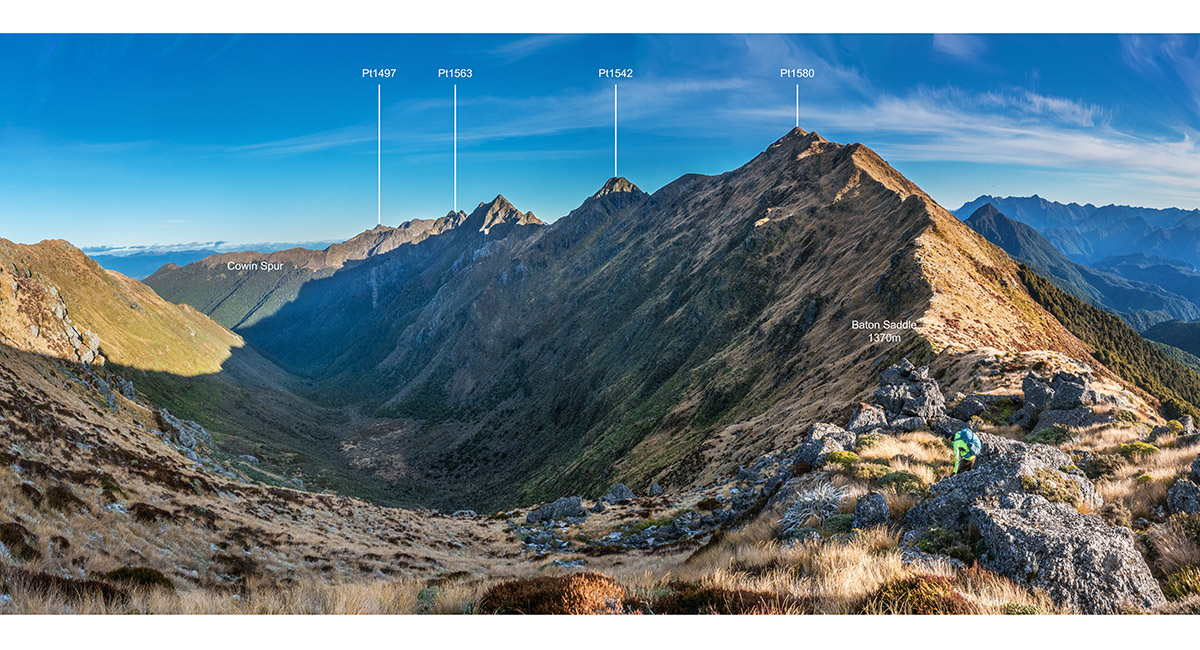
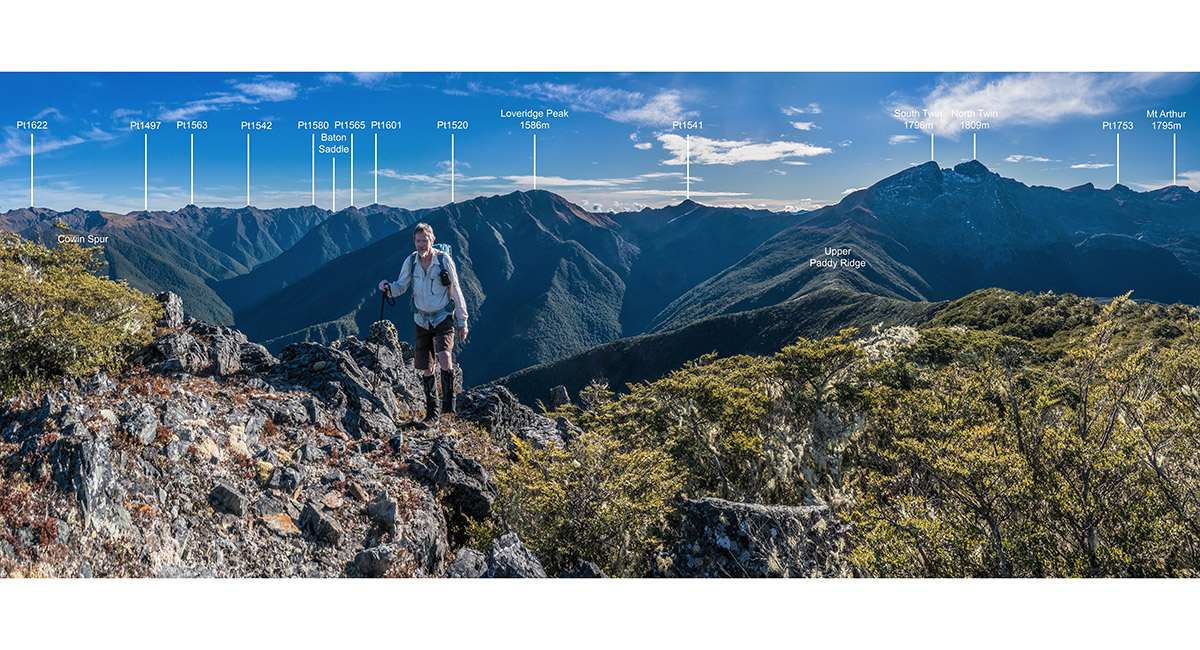
Having enjoyed another spectacular dawn, we continued north, staying on the sometimes steep and craggy ridge top until reaching Pt1497. This is where Cowin Spur begins its plunge down to Baton River 1250 metres below – our exit route for this eye-opening trip.


We paused to contemplate the view further along Wharepapa’s spine. Right in front of us was a spicy looking section of gnarly knife-edge that begged the question. Only one way to answer that, return to continue the quest.

Four months passed before I broke my vow of 2018. With Bruce, I did return to the Baton, making our way up to Flanagan’s Hut. With our expectations now more realistically calibrated, this time we planned to ascend via Baton Saddle, cover the ridge south, back to Pt1497, camp at a cluster of tarns at 1400 metres, then exit down the easier Cowin Spur route. It’s about a 6-hour slog up to the hut, with plenty of river crossings and undulations – about 300 cumulative metres of descent and 1000 metres of ascent, to reach the Hut. The valley doesn’t get much sun so is greasy and slippery underfoot, but some of the native bush and terraced waterfalls make for lovely photography. The whistle of Whio blue ducks added to the occasion too.
Soon after dawn next morning, two hours of grunting and cursing saw us up on Baton Saddle. The good news was that the weather was improving and the route for our day increasingly revealed itself through swirling but slowly dissipating cloud. Although the ground between us and the top of Cowin Spur was only about 6.5kms away, it involved about 800 metres of ascent and descent, often along narrow, craggy, steep terrain.

As time wore on we neared the crux of the day – Pt1563 and that gnarly section of ridge we’d pondered on our last trip from the top of Cowin Spur. Pt1563 was obviously too unruly, so it was an easy call to sidle beneath it on the east side.

As for the gnarly section, we gave it a go, scrambling up its steep west end on to the ridge top. This undulated until a very steep rollover, where we couldn’t tell if it would go, even if we made that far. So a short backtrack to a tiny saddle gave access to a steep chute leading down onto slightly friendlier ground, then giving access again to the ridge beyond Mr Gnarly. Once there we had no regrets in bailing from the ridge top. Mr Gnarly was indeed gnarly. The section between Baton Saddle and the tarns near the top of Cowin Spur took about 6 hours. That evening we consoled ourselves in the belief that we’d knocked off the hardest bits of Wharepapa, with just the section between South Twin and Baton Saddle to go.

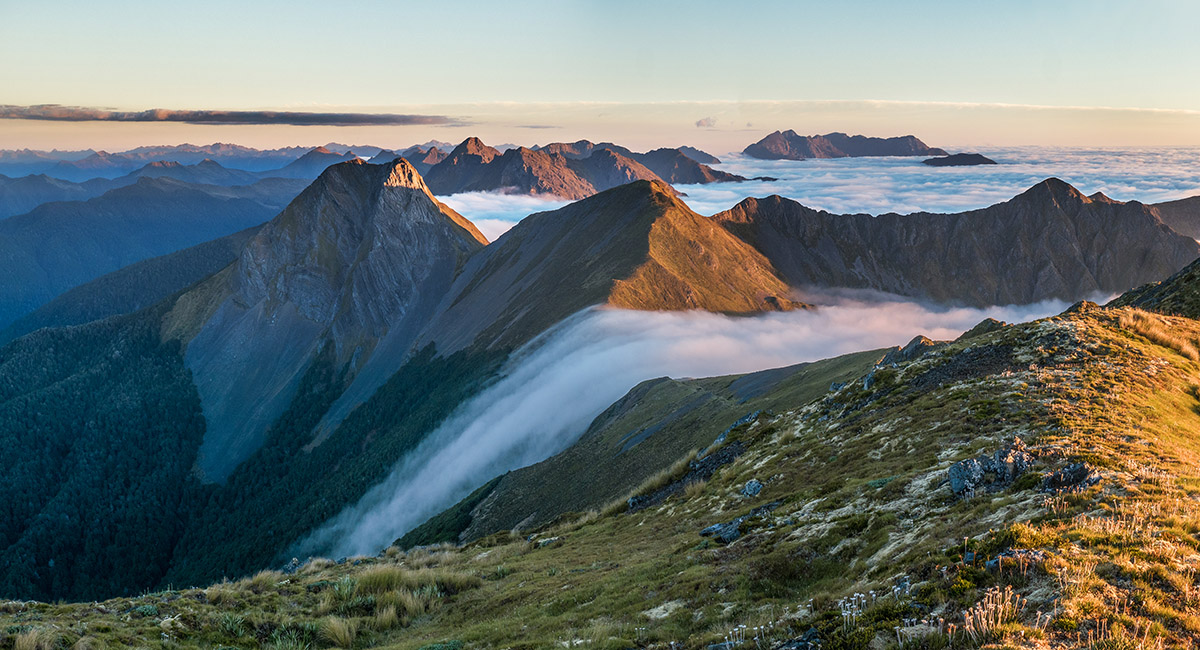
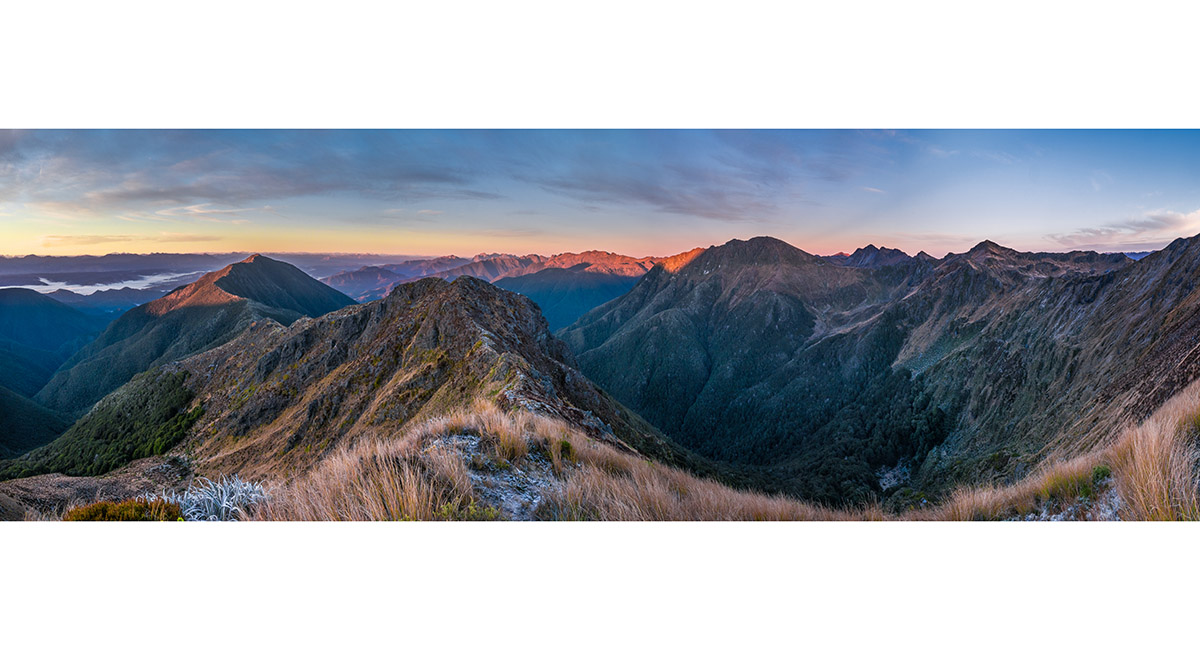
In Mid-June a nice big weather window presented itself – a sure sign that it was time to complete the quest. We figured that the most direct way to the south end of South Twin is up Paddy Ridge. This would avoid getting wet boots until the end of the trip and we knew there was a tarn (for water) up at about 1500 metres, just above where we planned to camp. Paddy Ridge, although a relentlessly steep slog up from Baton River all the way to Pt1463, proved to offer a much more defined trail than we’d expected. And once on top, the going was mostly easy. It took 7 hours to reach our camp spot at the point where the trail leading around to Ellis Hut drops off. We were near the shortest day of the year, so immediately headed on up to find the tarn before the light faded. Woops, we hadn’t factored in that water freezes up high in winter. Thankfully I found a rock not frozen to the ground and used it to break a small hole in the surface at the waters edge.


Although it was very cold up there, we were blessed with a lovely calm evening, and morning, with more wonderful magic hour photography.


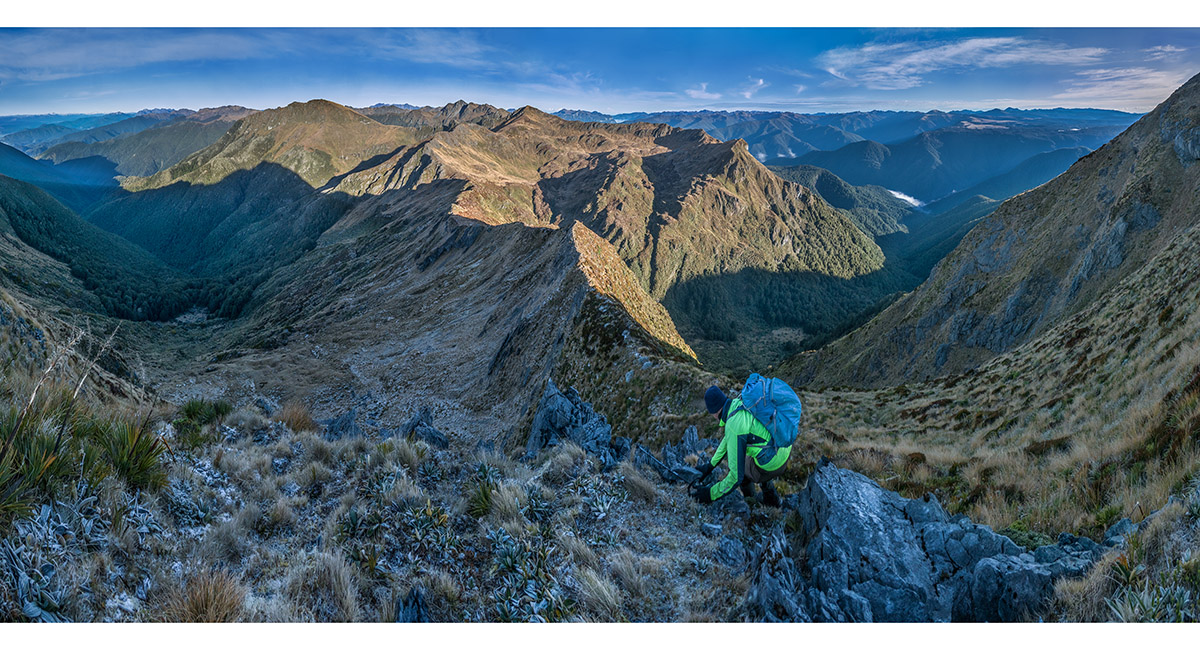
At 9a.m. we’d packed up and began our final section of Wharepapa – first straight up 200 metres to rejoin the main ridge on the shoulder of South Twin, which immediately plummeted 200 metres again. We sidled beneath Pt1476, then climbed to Pt1541.

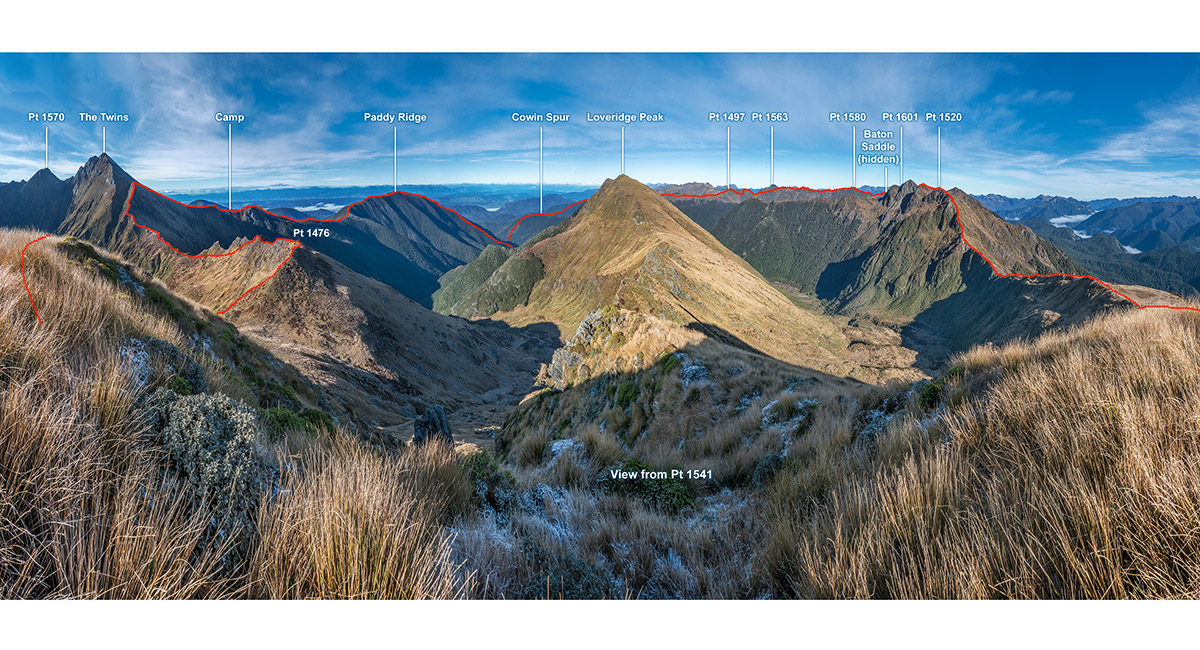
Looking at the topo, it all looks so straight forward and easy, with the ridge stretching west to Baton Saddle. Don’t be deceived – that section of ridge took us 7 hours, with 1,200 metres of ascent and nearly 1600 metres of descent. We’d originally hoped to drop packs and tag Loveridge Peak, about 1.2kms south of Pt1541. Just as well we didn’t, because night fall caught us at the bottom of Baton Saddle as it was.


The ‘best’ came last. Just as we locked onto Baton Saddle, with what appeared to be the last of the rugged stuff behind us, the ground beyond Pt1565 suddenly rolled over. What the! Unfortunately for us, we opted to try the south side, slithering our way into some unpleasant un-reclimbable ground with icicles hanging off around us. Eventually we edged our way down and back around to the ridge. Definitely choose the northern side if you find yourself here. Nec-minute a boulder field emerged in the dimming light just to keep us on our toes. Then of course, we had the joys of 300 metres of steep, slippery, rutted, overgrown, Spaniard-infested descent from Baton Saddle to conclude our day. Reaching the hut about 30 minutes after nightfall felt extra good.


Wharepapa’s generosity seems to have no bounds. Next morning when we reached the gnarliest section of trail about halfway down Baton River, we came upon a fresh slip that had wiped out the trail. With a 50-or-so-metre plummet to the river, the option of climbing higher looked just as horrible, so with hearts pounding, we managed to smear ourselves across the unstable 10-metre gap.


To order a print or web resolution file of any image you see in this slide show, just right click the image, click “Copy Image URL” and paste in to the “Your message” box of our Contact Us form. Please also note, for each image, if you want a print or web resolution file. We will get back to you as soon as possible to confirm price and payment details.
Open Contact Us in a new window to paste Image URL(s) easily